Step by step setup
| < PREVIOUS: Recorder overview | > NEXT: Recorder controls |
|
|
|
|
Here we demonstrate how to set one channel for basic recording. Once you get one channel to work, you can repeat it for all others and use the advance options in the other tabs. But first, get the channels you need to work using the following three steps:
Step 1 - Setting Channel Identification
Click on the channel number-button (left side) to open the configuration window of the channel:
 The first tab is Identification & Mode, please go carefully through the options: Bird Name: type the bird name here (e.g., R503). Note that this name will be overwritten ever time you change animal via the the “Animals” tab. States & Modes: each channel can record in one of the following modes: Active: The channel record sound when triggered by an appropriate input; Monitor only: The channel display the sound but does not record or trigger other channels; Direct recording: The channel behaves like a simple tape recorder (remember those devices?): it turns on by clicking start and off by clicking stop. It records files of certain duration, e.g., a new file every minute. Pre-Buffer: In the Active mode recording is triggered by 'sound events' but quite often it is desired to have the recording starting a little bit prior to the trigger. This control allows you to set how many samples are recorded prior to triggering. Setting it to 44100 will record sound starting 1 second before triggering occurred (e.g., about 1s before the song begins)..
Step 2- Setting the Input & Output Channel
Select the Input Selection tab: IO Module: You may select between DirectSound and ASIO driver modules. Each time you make a selection you will see the available devices (if any) that are supported by those drivers. Most simple (stereo) sound cards will appear when selecting DirectSound. Multi-channel sound cards will usually appear as both DirectSound and ASIO devices, but in most cases you will need to use the ASIO module to access individual channels. Device: select the sound device of your choice. Format: for DirectSound select stereo and then in Channel selection go for left or right. This will result in a mono-left or mono-right recording (do not select mono format unless you want to join the channels). In the ASIO simply select the channel you need (stereo mode does not apply). If you want to play sounds while recording, go to the Output selection and repeat your choices. The File Selection allows you to select a sound file to play during recordings.
Step 3 - Setting the Sound Storage Folder
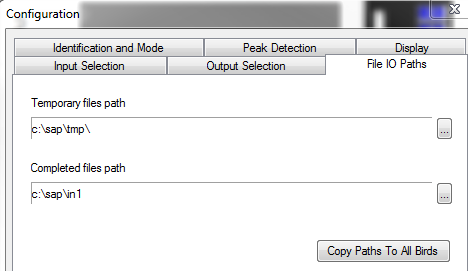
Go to the File IO Paths tab. By default, the path should look like this:
 Once (actually a little bit before) sound recording is triggered, the SAP2011 recorder starts saving a temporary wave file into the hard disk. This storage folder (temporary file path) must exist, otherwise, nothing will be saved ever. Once recording is triggered off, the recorder “decides” to either delete the temporary file, or to move it into a “Complete files path”. Note, however, that “complete” from the point of view of the recorder, is the input folder of the “Live” module, which perform spectral analysis and made a final decision about the storage. If you have two hard disks in your computer, it is recommended to use the other hard disk (D) for both temporary and complete storage, so as to leave the system hard disk (C) protected.
That's it! Click OK to exit the configuration window (for now, ignore the warning about changing bird's name) and click “Start”. If all is cool, you should see the oscilloscope display moving for the channel you just set as shown below.
 now stop the recording, and repeat for all other channels.
Once done, please continue to the next session about recorder control, it will provide you with important information about how to managed the recording parameters.
Troubleshootings 1. Nothing happens, no green oscilloscope can be seen: First is 'active' checked? Try clicking “stop” and start again. If nothing happened, make sure that there are no duplicate channels and that the channel name is valid. If the problem is not solved, click stop, go to channel configuration, click output selection and click 'clear selections'. Click OK and try again. 2. The oscilloscope is frozen: Click “Start” and look at the bottom right of the channel: Are the numbers moving? If yes, recording is happening, but the gain is two low. Move the gain slider up (blue label) and see if any signal appears. If this does not help, it is likely that you have a hardware problem (microphone not connected?). If the numbers are not moving, the channel itself is not working – try restarting your computer.
|
|

