Recorder controls
| < PREVIOUS: Step by step setup | > NEXT: Setting recording channels |
|
|
|
|
The Recorder Control Panel allows you to start and stop the engine, to change the overall appearance of the recorder, and to save the recording and playbacks configuration.

Start & Stop: All the 10 recording and playback channels are controled by a single engine. Starting the engine and stopping it therefore apply to ALL the functionality of the recorder. Each channel (recording and playbacks) is enabled and dissabled seperately in the channel control. Wider/Smaller: This button tuggles between compact display and large display where oscilloscope is twice larger for each channel. Stats: Clicking stats will display several statics about the recording events. It is better to display those in the Wider mode: Save: Save all channels configurations including recording inputs, outputs, sessions, and playbacks.
{rec controls} {----------input oscilloscope-------------------------- } { playbacks control} 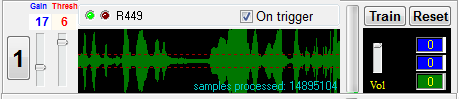 The Oscilloscope Display The scrolling display allows you to see the amplitude envelope of the signal scrolling (slowly or fast) from right to left. It will allow you to identify, for example, song syllables. The horizontal red doted lines represent the recording threshold. We will talk about this threshold in details shortly, but note how easy it is to see the cases where signal amplitude passed that threshold. Peak Count is showing you the number of samples that passed the threshold during the current “session”. Gain: moving the gain slider changes the gain of the display of the oscilloscope. It has no effect on the recording, so feel free to play with it. You want to set it such that vocal sounds are clearly visible.
Thresh: In the default 'on trigger' recording mode, recording session starts when the oscilloscope passed a threshold, that you can see as two horizontal red dotted lines. Set the threshold just above the noise level.
Note that the threshold (red lines) do not scale when adjusting the Gain. You should calibrate your channel by first setting the gain, so that you can see the vocalization envelope, and only then by adjusting the threshold, to have the red lines just above the background sound level. If you adjust the Gain later on, remember to also adjust the threshold.
LDE lights (green, red): When a recording session takes place, the green LED light will turn on. When sound level is too high and sounds are getting clipped (this has nothing to do with the gain, but with your hardware recording amplification level) the red LED will turn on.
Keep in mind that SAP2011 allows pre-triggering of recording, namely, the recorder keeps a ring buffer of the signal so that it can decide if to save or discard a recording session retroactively (a few seconds later). Therefore, depending on how selective you like the recorder to be, you might want to see a larger chunk of sound in the display mode. Moving the scroll slider to the left allows you to see several seconds of sound signal, e.g., to detect a song bout by visual inspection. Of course, the display is irrelevant to the detection algorithm, but it allows you to judge the behavior of the detector based on your visual inspection. |
|