Segmentation of Syllable Units
| < PREVIOUS: Spectral Derivatives | > NEXT: Setting the Spectral Parameters |
|
|
|
|
Open Explore & Score --> Open Sound --> Select file you wish to explore (a quick preview of the sound is provided in the lower portion of the screen) & choose the Pagination option in the lower right corner; full file (recommended for smaller files) or page by page (recommended for larger files of 5 seconds or more) -->Click OK Fig 1: Open Sound window
Select Segmentation Panel tab on the left side of the window. Fig 2: Segmentation Tab Select primary Feature to segment; There are nine available options:
.
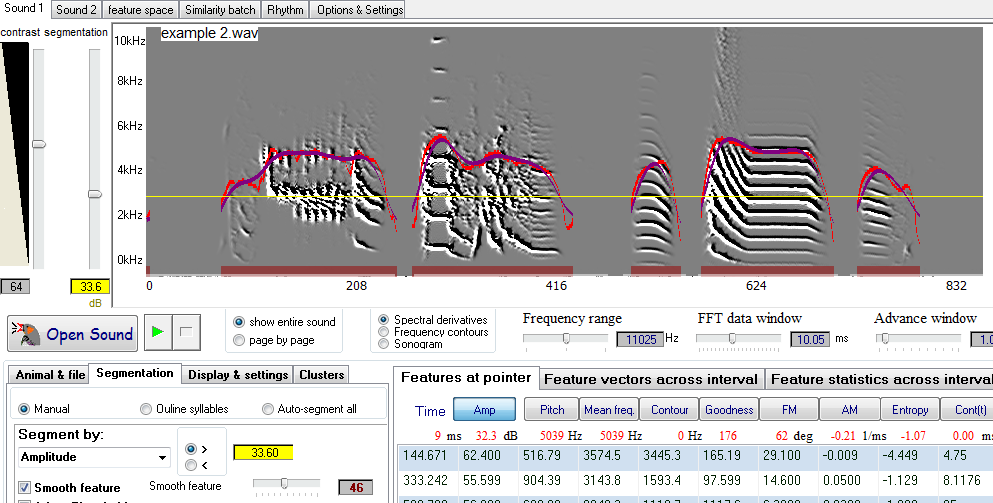
Move amplitude threshold slider located next to the sonogram screen to the appropriate level, while watching the segmentation changing below the sonogram. The yellow horizontal line on the graph indicates the level of the threshold. The feature can be shown when greater than the threshold (if ">" option is selected next to threshold) or less than the threshold (if "<" option is selected). Syllables are shown on the bottom of the graph screen in thick red line segments.
Check "Smooth feature" checkbox, the Smooth feature slider will show. Select the level to which to smooth the feature. The lowest level is 0, which means that the feature will not be smoothed. The highest level is 100, which means that smoothing window is 100 datapoints. For example, if the advance window param is set to 1 ms, then the smoothing window of 100 is 100 ms. The smoothed feature graph will appear in different colors depending on which feature is smoothed. For example, smoothed amplitude will appear in purple, while original amplitude graph is red.
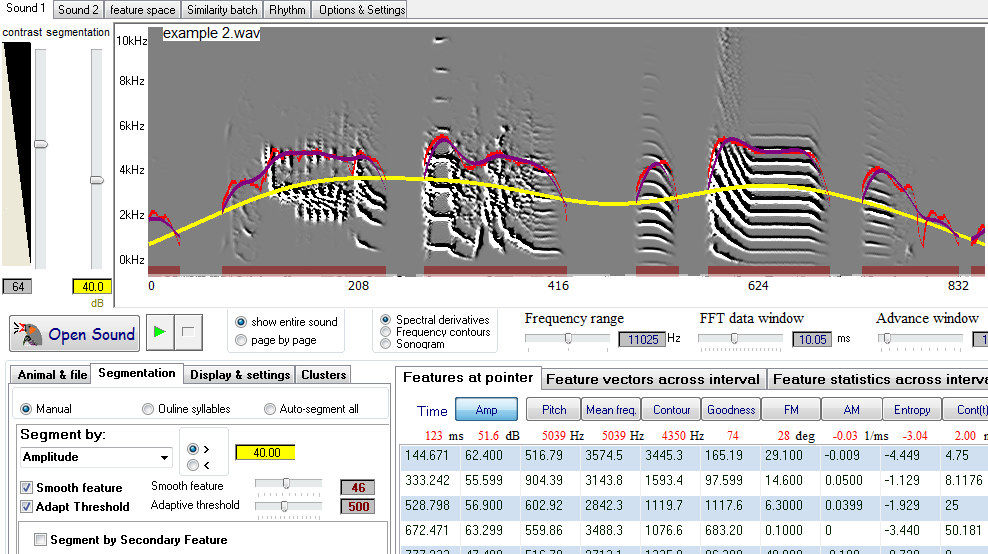
Check "Adapt Threshold" checkbox, the Adaptive threshold slider will show. Select the level to which to adapt the threshold, such that threshold increases with the mean amplitude. This allows better detection of low amplitude sounds (e.g., in the beginning of the file). The lowest level is 200, which means that threshold is adapted every 200 slices, making it of the similar shape as smoothed feature graph. The highest level is 900, the threshold is adapted every 900 slices, making it almost a straight horizontal line. That is, at the extreme, smooth threshold becomes identical to the fixed threshold. Adjusting the threshold level with the slider will move the adapted threshold so that the mean of the threshold is on the level selected by the slider (i.e. the adjusted threshold will move up and down as slider is moving). The threshold is indicated by the thick yellow line. As with fixed amplitude, the feature can be shown when greater than the threshold or less than the threshold. warning: using adapt threshold in pagination mode (small windows) will affect the segmentation.
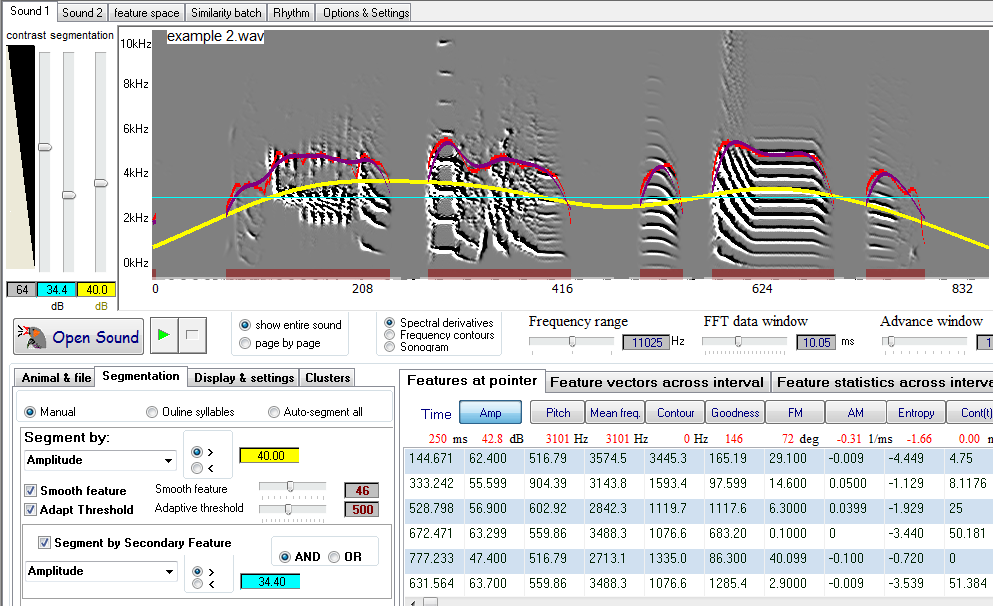
Check "Segment by Secondary Feature" checkbox, the secondary feature controls as well as secondary threshold slider will show. Select a secondary feature to segment by. Select whether you want to segment by combining both features (Primary feature AND Secondary feature), or segment by either feature (Primary feature OR Secondary feature). Use the secondary threshold slider to select the threshold level. The secondary feature can be shown when greater than the threshold (if ">" option is selected next to secondary threshold) or less than the threshold (if "<" option is selected). The secondary feature may be the same as the primary feature (usually smoothed) or set up the threshold min and max by using primary and secondary thresholds. For example, as seen in the figure above, our segmentation is too liberal in the edges. Using fixed amplitude threshold as a secondary feature solves this problem by imposing a minimum amplitude threshold:
Click Preview button located below the graph screen. The preview of the entire file will appear. In Page by Page mode, click on the portion of the sound in the preview screen that you wish to view in detail and/or segment. The graph screen will show the portion of the file highlighted in Preview screen.
Move the cursor to the right edge of the graph to make the Forward button Move the cursor to the left edge of the graph to make the Back button <--------------------------------------------------------------------------------------------------------------------------------------------------------------------------------------------------------------------------------------------------
Open Explore & Score, Ensure that “fine segmentation” is turned off (see Fig 1 below) |
|
|
Fig 1: Fine Segmentation "off"
|
|
|
Open your sound file or use Example1 (found in the sap directory) and then move the amplitude threshold slider (the one closest to the frequency axis) up to about 43Db: |
|
|
Fig 2: Amplitude Threshold Slider
|
|
|
The yellow curve shows the amplitude, and the strait yellow line is the threshold. Amplitude is shown only when above threshold. Syllable units are underlined by a light blue color below them, and bouts are underlined by a red color. |
|
|
|
|
|
Fig 3: Segmentation outlines
|
|
|
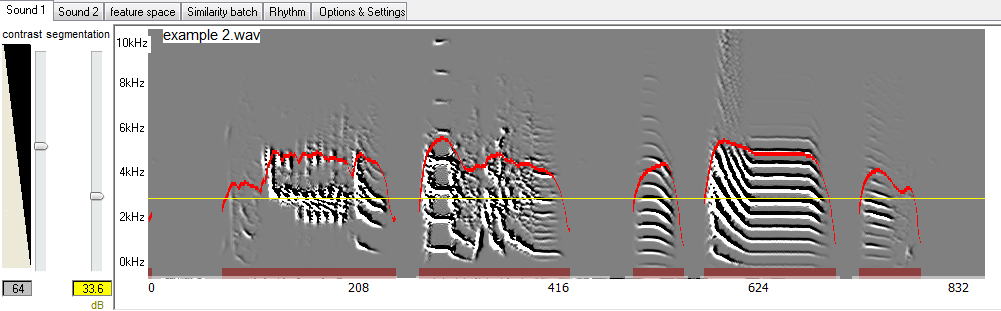
Additional constraints on segmentation can be set, so at to reject some sources of noise. Here is an example: |
|
|
Fig 4: Frequency of syllables
|
|
|
As shown, the last 3 ‘syllables’ are actually low frequency cage noise. Move the mouse to just above the noise level while observing the frequency value at the Features at Pointer panel (see red arrow). As show, most of the noise is below 1500Hz, whereas most of the power of the syllables is above that range. |
|
|
Fig 5: High Pass - Noise Detector
|
|
|
Go back to sound 1, and click update display below the sonogram image: |
|
|
Fig 6: Noise - No longer detected
|
|
|
Note that the most of the noise is no longer detected as vocal sound: |
|
|
Fig 7: Noise isolated from vocal sounds
|
|
|
This filter does not affect any analysis of the remaining vocal sounds. This is because we set the noise detector filter as an additional criterion (on top of the amplitude threshold) to eliminate ‘syllables’ where at more than 90% of the energy is at the noise range. |
|
|
Fig 8: Noise isolated from vocal sounds
|
|
|
Now click update display: |
|
|
Fig 9: Noise isolated from vocal sounds
|
|
|
And the outlines under the noise that is below the detection band should disappear. Note, however, than now all features for all syllables are only computed based on the band-pass filter that you set. Namely, frequencies outside the band are ignored across the board.
One limitation of static amplitude threshold is that when an animal vocalizes the “baseline” power often change as vocalization becomes more intense. For example, open the file “thrush nightingale example 1” with 3ms advance window and 0 amplitude threshold. Let’s observe the amplitude envelope of this nightingale song sonogram: |
|
|
Fig 10: Noise isolated from vocal sounds
|
|
|
And let’s also look at the spectral derivatives, and a certain threshold indicated by the black line: |
|
|
Fig 11: Noise isolated from vocal sounds
|
|
|
It is easy to see that no fixed threshold can work in this case (see arrows). To address this, turn “fine segmentation” on. A new slider – called Diff – should appear between the amplitude threshold slider and the display contrast slider. Set it to zero (all the way up). In the fine segmentation box (bottom left of the SAP2 window) set the course filter to 500, fine filter to 0, update display and click filters: |
|
|
Fig 12: White curve - coarse amplitude filter, black line - fine filter, and segmentation
|
|
|
The white curve shows the coarse amplitude filter, which is the dynamic (adaptive) threshold. The black line is the fine filter, which is the same as amplitude in this case. The segmentation is set by the gap between them, where diff=0 means that we segment when the black line touches the white line, namely vocal sound is detected when the fine filter is higher than the course filter.
A simple way of avoiding false detection of silences is to impose some minimal fixed amplitude threshold on top of the filters. To do this, set the Db threshold to 24: |
|
|
Fig 13: No more silence is detected
|
|
| As shown, no more silences are detected as sounds. To decrease the sensitivity of segmentation we can use two methods. One is to make the Diff more liberal – allowing the detection of sounds even when the fine filter is slightly below the coarse one. Set the diff to -2.5 gives this result: |
|
|
Fig 14: Setting the "diff filter to -2.5"
|
|
|
It is often better approach is to set the fine filter a bit coarser. For example setting fine filter to 5, keep course filter at 500, and setting the diff slider to -1.5 gives this segmentation: |
|
|
Fig 15: Sound with fine filter set a to coarser setting
|
|
| As shown, we have achieved a rather reliable segmentation despite the wide range of amplitudes in this song. | |